Before I learned about AC Tool, I worked with a couple of projects several years ago – they were quite big and had many markets and locales. And, as you can imagine, these projects had quite a sophisticated hierarchical structure of users and groups. Time to time, we were rolling out content for new markets/locales, what required the creation of a bunch of groups and setting of correct permissions to them. This routine required one developer to be fully focused on this job for several hours until everything was created, assigned and activated. Then, we had to synchronize made changes among all environments, and later, sometimes, fix issues which we made because of human mistake. If only we had Access Control Tool that days.
What is Access Control Tool?
Access Control Tool (or simply AC Tool) developed by Netcentric allows us to specify complex Access Control Lists in separate files in yaml format. With it, we are able to create and configure groups and users. Furthermore, it can export all existing AC entries in the system, so migration to AC Tool is really easy!
Why do you need AC Tool
AC Tool provides a great set of features which we can and should use. It allows not only persisting of ACLs inside the project but also it represents these ACLs in human readable yaml format. Having ACLs defined in the sources allows testing it as we test any other thing in the project according to a development/release circle. Some small set of what we can do with this tool:
- define ACLs;
- create users (including name, password, groups and profile content);
- define groups (like name, path, members);
- provide different ac configurations for different run modes;
- clean up repository by purging obsolete authorisables;
- use loops which are derived from a content structure.
A good comparison with alternatives can be found here.
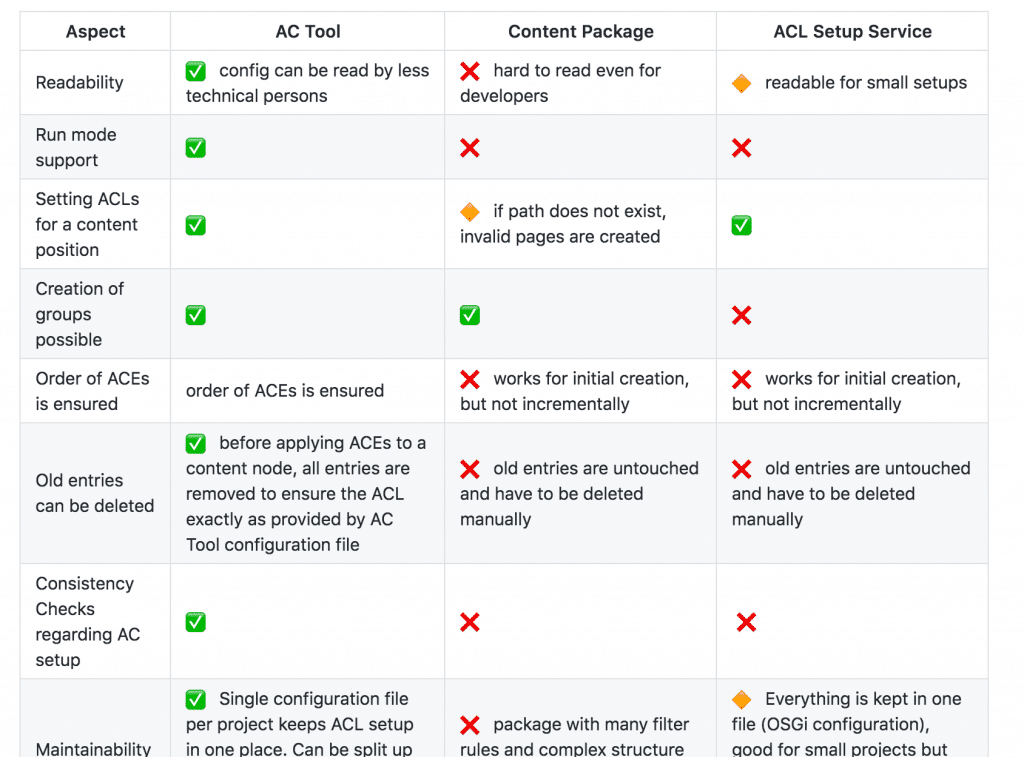
How may look the project setup with AC Tool
First of all – we need to install the package with the tool into AEM instance. We can grab the package from maven repository https://repo1.maven.org/maven2/biz/netcentric/… Unfortunately, there is no good wat so far to embed it into our configuration (or other) package and have is installed automatically.
Now we need to select a way we want to apply our yaml configuration files to AEM instance: most probably you use content-package-maven-plugin in your project and it would be a good idea to go with. Put your yaml files into the package module and configure the plugin:
<plugin>
  <groupId>com.day.jcr.vault</groupId>
  <artifactId>content-package-maven-plugin</artifactId>
  <configuration>
    <properties>
      <installhook.actool.class>biz.netcentric.cq.tools.actool.installhook.AcToolInstallHook</installhook.actool.class>
    </properties>
  </configuration>
</plugin>
For other ways of configurations installing check this page.
Migrating to Access Control Tool
Now we need to setup configuration which represents our current state in AEM. You have tens/hundreds of groups and you think it will take days to do this? NOPE! You just need to use export feature of AC Tool and get yaml files generated for you.
Go to /system/console/jmx and navigate to ACTool bean.

Trigger export based on groups clicking on groupBasedDump(). You will get a dump of all groups and related to them ACEs.
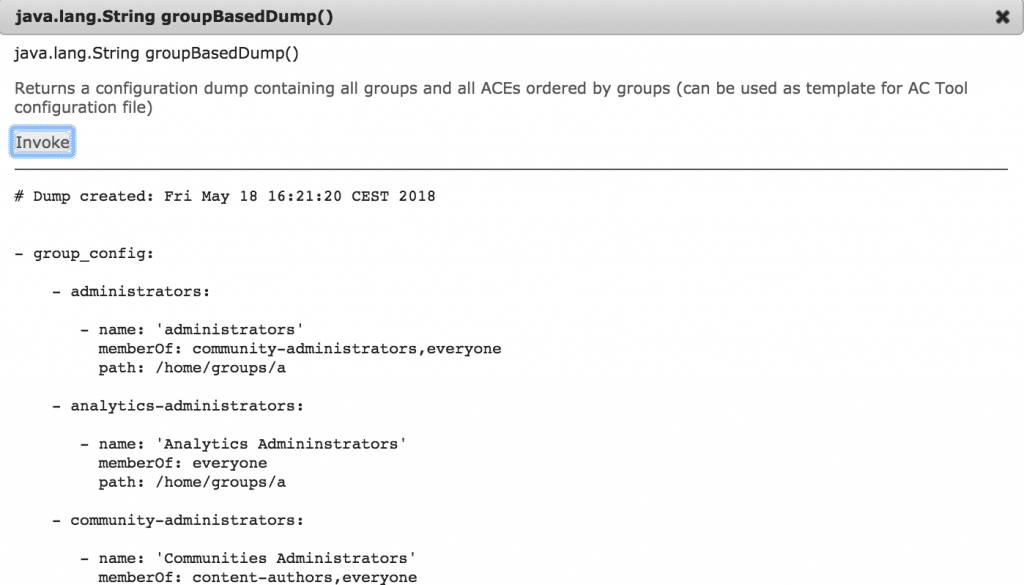
Now you can copy rules to the package. Make sure to clean up configuration – most probably, you don’t want to manage most of OOTB groups (e.g.: “administrators”) with AC Tool. More info on this topic is available on GitHub.
Organizing configuration in the project
Storing groups definitions and their ACEs together in one file does not much help to increase maintainability of our AEM system. So we need to split them into files and folders. One of the approaches I will describe below.
Global fragments
We define two fragments – one denies access to all the content and features within AEM and another gives permissions to the resources which allow basic usage of the platform (e.g. /var, /libs). Later, each role will be a member of both these fragment groups.
For the demo purposes, we will only restrict access to /content section and to Projects Console. In a real project, you will want to have a complete ACEs list for all the futures in AEM.
# File /apps/taradevko/acl-configuration/fragments.author/platform-access.yaml
- group_config:

  - fragment-restrict-basic:

    - path: /home/groups/taradevko/fragments

  - fragment-allow-basic:

    - path: /home/groups/taradevko/fragments

- ace_config:

  - fragment-restrict-basic:

    # Restrict access to the content

    - path: /content
      permission: deny
      actions:
      privileges: jcr:read,jcr:readAccessControl
      repGlob:

    - path: /content
      permission: allow
      actions:
      privileges: jcr:read,jcr:readAccessControl
      repGlob: ""

    - path: /content
      permission: allow
      actions:
      privileges: jcr:read,jcr:readAccessControl
      repGlob: /jcr:*

    # Here you may want to disable access to all the main editing consoles and content.
    # For the demo purposes we just disable it for Projects console

    - path: /libs/cq/core/content/nav/projects
      permission: deny
      actions: read

    - path: /libs/cq/core/content/projects
      permission: deny
      actions: read

    - path: /content/projects
      permission: deny
      actions: read

#   - fragment-allow-basic:
#     Here you may want to allow basic to the platform, e.g. /libs, /var and default design.
Configuration attributes are more or less self-explaining but to get a good overview of available attributes and their possible values you can refer to the official documentation. Also, note that folder contains “.author” at the end, what tells the tool to apply this configuration only on author AEM instance. As long, as we do not deny access to the basic functionality we have nothing in ace_config section for fragment-allow-basic.
Functional fragments
Now we want to define functional fragments which allow accessing features we denied above. In our case, we need to define only one – for the Projects Console.
# File /apps/taradevko/acl-configuration/fragments.author/authoring-fragments.yaml
- group_config:

  - fragment-projects:

    - path: /home/groups/taradevko/fragments

- ace_config:

  - fragment-projects:

    - path: /libs/cq/core/content/nav/projects
      permission: allow
      actions: read

    - path: /libs/cq/core/content/projects
      permission: allow
      actions: read

    - path: /content/projects
      permission: allow
      actions: read
Content fragments
We also want to define fragments for accessing content (as we may have several projects and/or markets/languages in one AEM installation and different roles should have access to different parts of the content. In this example, we will use default We Retail site as a target.
# File /apps/taradevko/acl-configuration/fragments.author/content-fragments.yaml
- group_config:

  - fragment-weretail:

    - path: /home/groups/taradevko/fragments

- ace_config:

  - fragment-weretail:

    - path: /content/we-retail
      permission: allow
      actions: read
User Role definitions
Finally, we define user roles for our project.
# File /apps/taradevko/acl-configuration/taradevko.author/roles.yaml
# All roles are defined here

- group_config:

  - group-taradevko-project-viewer:

    - path: /home/groups/taradevko
      isMemberOf: fragment-restrict-basic,fragment-allow-basic,contributor,fragment-projects

  - group-taradevko-content-viewer:

    - path: /home/groups/taradevko
      isMemberOf: fragment-restrict-basic,fragment-allow-basic,contributor,fragment-weretail
In the configuration above we defined 2 roles – one for viewing projects and another for viewing We.Retail’s content. It’s probably not the best real-world example but it’s a good demonstration of the approach.
As stated before, for the sake of simplicity we do not restrict access to everything and do not provide separate fragments to allow features like Sites console. So we will use predefined group contributor which already have all the basic permissions we need.
Testing AC Tool configurations
Ok, now we want to deploy and test these configurations. To do this we will need some test users. Why not create them with this tool as well?
# File apps/taradevko/acl-configuration/test-users.local,dev/test-users.yaml
- user_config:

    - test-content-viewer:

        - name: "Test Content Viewer"
          isMemberOf: group-taradevko-content-viewer
          password: test-content-viewer
          path: /home/users/taradevko/test
          preferencesContent: <jcr:root jcr:primaryType="nt:unstructured" cq.authoring.editor.page.showOnboarding620="false" cq.authoring.editor.page.showOnboarding62="false" granite.shell.showonboarding620="false"/>

    - test-project-viewer:

        - name: "Test Project Viewer"
          isMemberOf: group-taradevko-project-viewer
          password: test-project-viewer
          path: /home/users/taradevko/test
          preferencesContent: <jcr:root jcr:primaryType="nt:unstructured" cq.authoring.editor.page.showOnboarding620="false" cq.authoring.editor.page.showOnboarding62="false" granite.shell.showonboarding620="false"/>
One test user for each role. Passwords are not encrypted but it’s fine for our test system – as you can see folder name contains runmodes local and dev so it will not be applied to rest environments (e.g. production). Here we also provide the content of the preferences node – we don’t want to get “Getting Started” popups in AEM. It’s time to deploy and check the results!
mvn clean install -PautoInstallPackage
Under /var/statistics/achistory we can check logs and status of previous installations. This is the first place to check if you package installation fails because of the AC Tool. In our case, status is “success”.

Let’s now impersonate – first as a Test Project Viewer user.
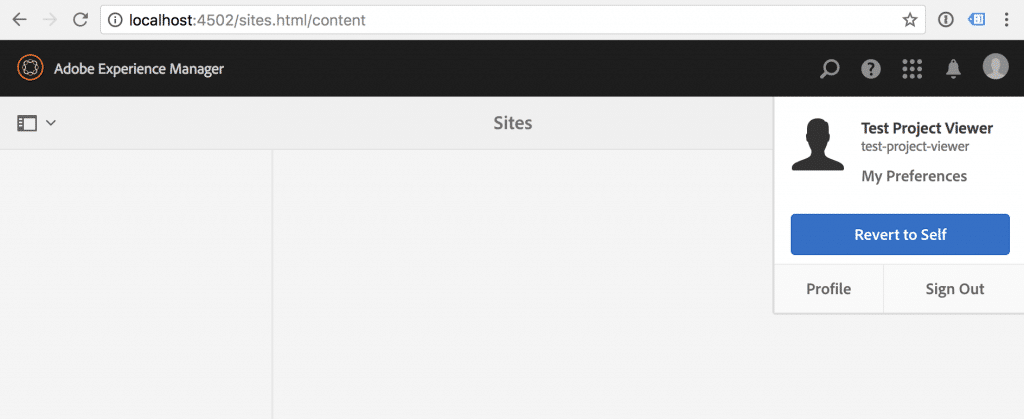
As expected, Sites Console shows no content.
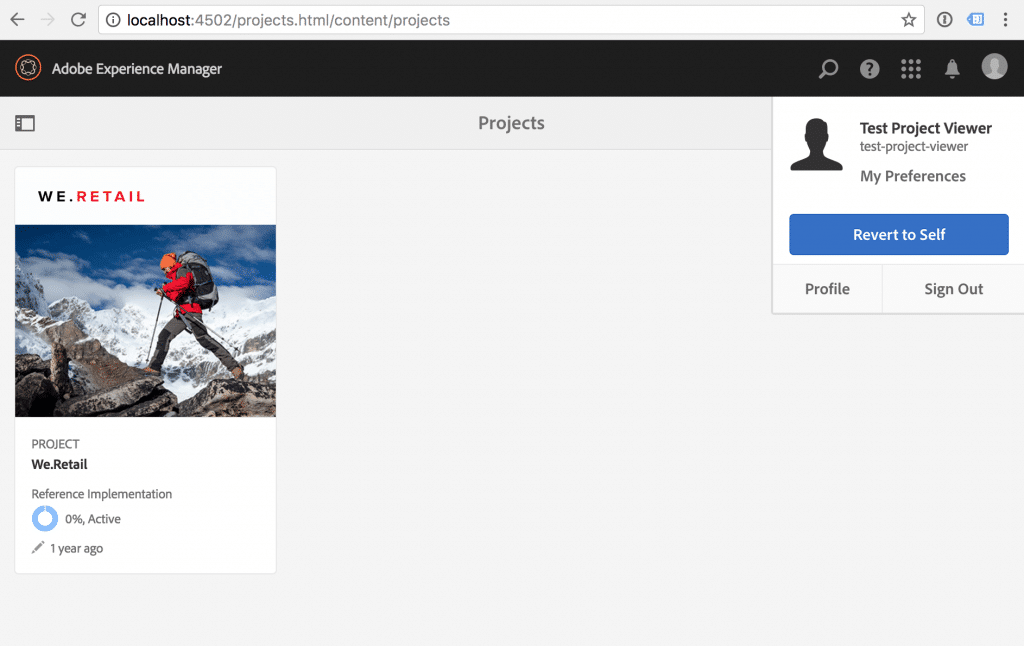
In Projects Console we see a project for We.Retail site. Now it’s time for “Test Content Viewer”.
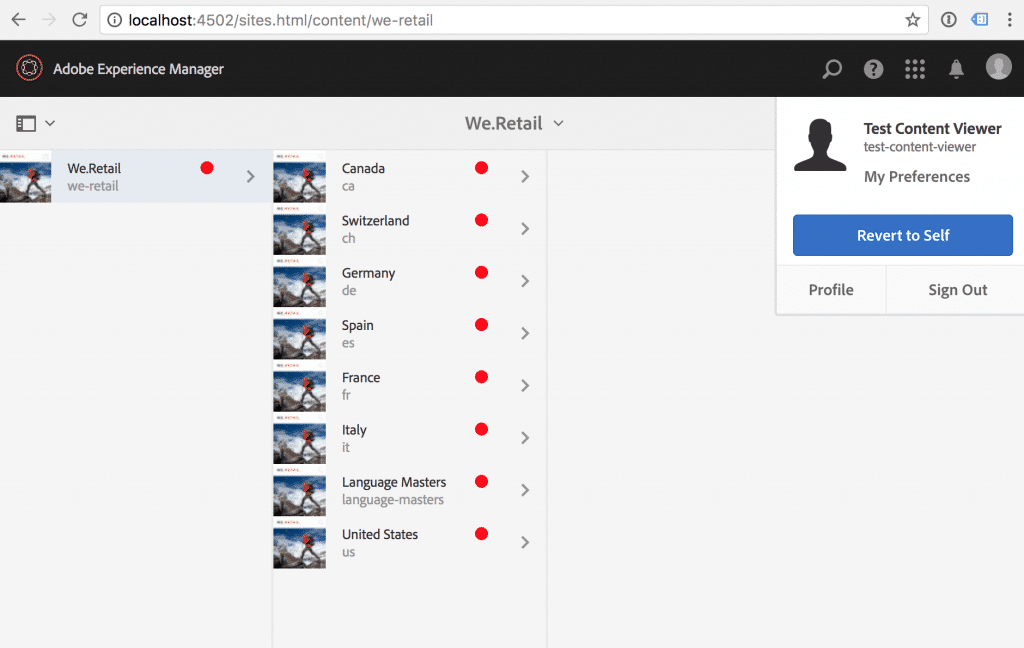
The user sees only We.Retail site (admin also would see campaigns and screens folders there).
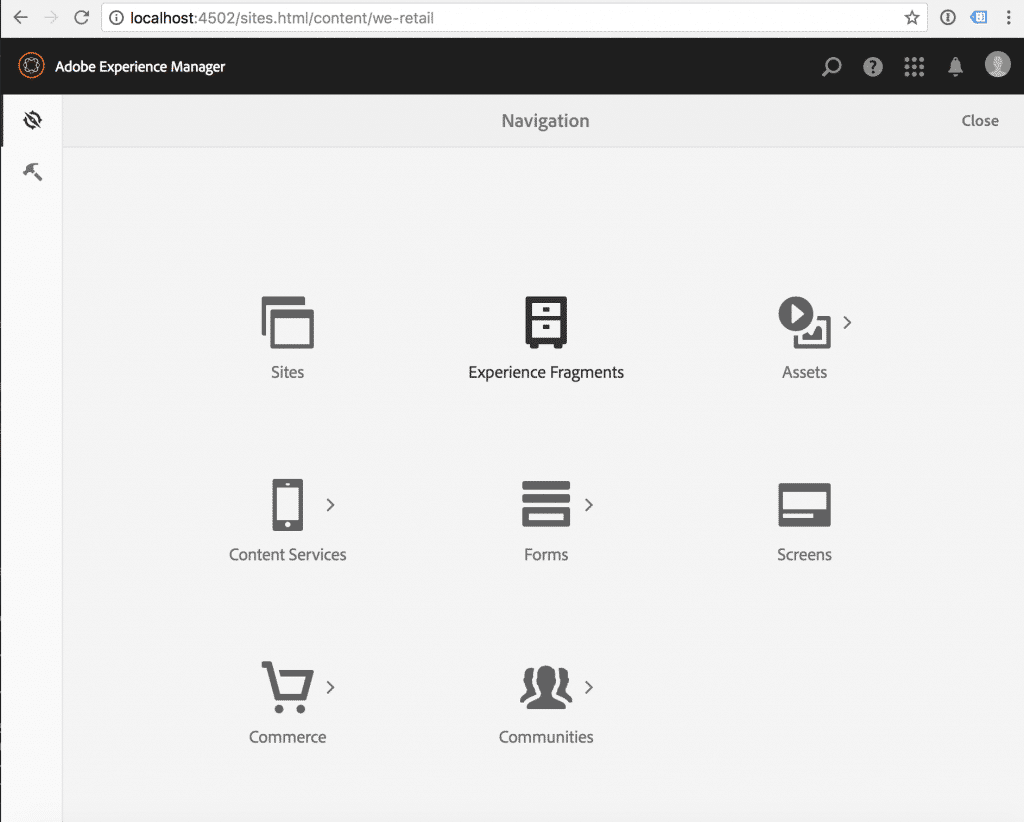
There is no Projects icon in Navigation. If the user will try to Projects Console directly by the link (/projects.html) – he will get 404 error.
What’s more?
Service User
Using AC Tool we can define service users. E.g.:
# File /apps/taradevko/acl-configuration/system-users.yaml
- user_config:

    - service-a-user:

        - name: "System user for We-Retail content"
          isMemberOf: fragment-weretail
          path: /home/users/system/taradevko
          isSystemUser: "true"
Encrypted Password
Sometimes it’s quite useful to create a real user which will get even to production – one of such cases is Replication Receiver for the publish AEM instance. To be safe enough we should have password encrypted in our configuration file. This can be done with AC Tool:
# File /apps/taradevko/acl-configuration/replication.publish/replication-user.yaml
- user_config:

    - replicationReceiver:

        - name: "Section A replication receiver"
          password: "{c8e4c8f496979cced14e3334b90d9bf6ef2dbb5b064127ac8881f072656124691a55582b40ed83849dcc67a07f0a7ed8}"
          path: /home/users/taradevko/replication

- ace_config:

    - replicationReceiver:

        - FOR replicationPath IN [ /content/section_a, /etc/tags/seaction_a ]:

              - path: ${replicationPath}
                permission: allow
                privileges: jcr:all
Crypto Support Console (/system/console/crypto) can be used to get the encrypted password. But you have to make sure that you share the same crypto key among all instances this configuration should be applied to.
Global Configuration
Some things can be configured globally. E.g. we can configure minimal required version and in case version of installed AC Tool is less than specified – configurations will not be applied.
- global_config:
      minRequiredVersion: 2.0.4
You can find complete documentation on GitHub.
All configurations from this article are in this repository.
Nice post, dude! Maybe it’s the reason to add Disqus here ?
Поиск в гугле
Europe, and in Ancient Russia